In today’s era of interconnected devices, building an IoT (Internet of Things) project not only enhances your technical skills but also provides practical insights into real-world applications. In this article, we will explore how to create a simple yet effective IoT weather station using NodeMCU v3.0 and the DHT11 temperature and humidity sensor. We’ll set up a web server to display real-time weather data in a clear and readable format.
⚠️Disclaimer:
Working with electricity involves serious risk. Ensure you have the necessary skills and take proper safety precautions before attempting any electrical projects. Proceed at your own risk — the author assumes no responsibility for any damage, injury, or issues resulting from the use or misuse of the information provided.
All content on this website is original and protected by copyright. Please do not copy or reproduce content without permission. While most of the resources shared here are open-source and freely accessible for your learning and benefit, your respect for our intellectual effort is appreciated.
If you find our tutorials helpful, consider supporting us by purchasing related materials or sharing our work — it helps keep the content flowing.
Need help or have questions? Leave a comment below — the author is always happy to assist!
It is really fun to check the weather information such as Temperature and Humidity on the website. And if it is using a NodeMCU, it becomes more exciting. Anyway, let’s see what you need to make this amazing project.
Table of Contents
Components Needed
- NodeMCU v3.0 (ESP8266)
- DHT11 Temperature and Humidity Sensor
- Breadboard and jumper wires
- USB cable for power and programming
- Computer with Arduino IDE installed
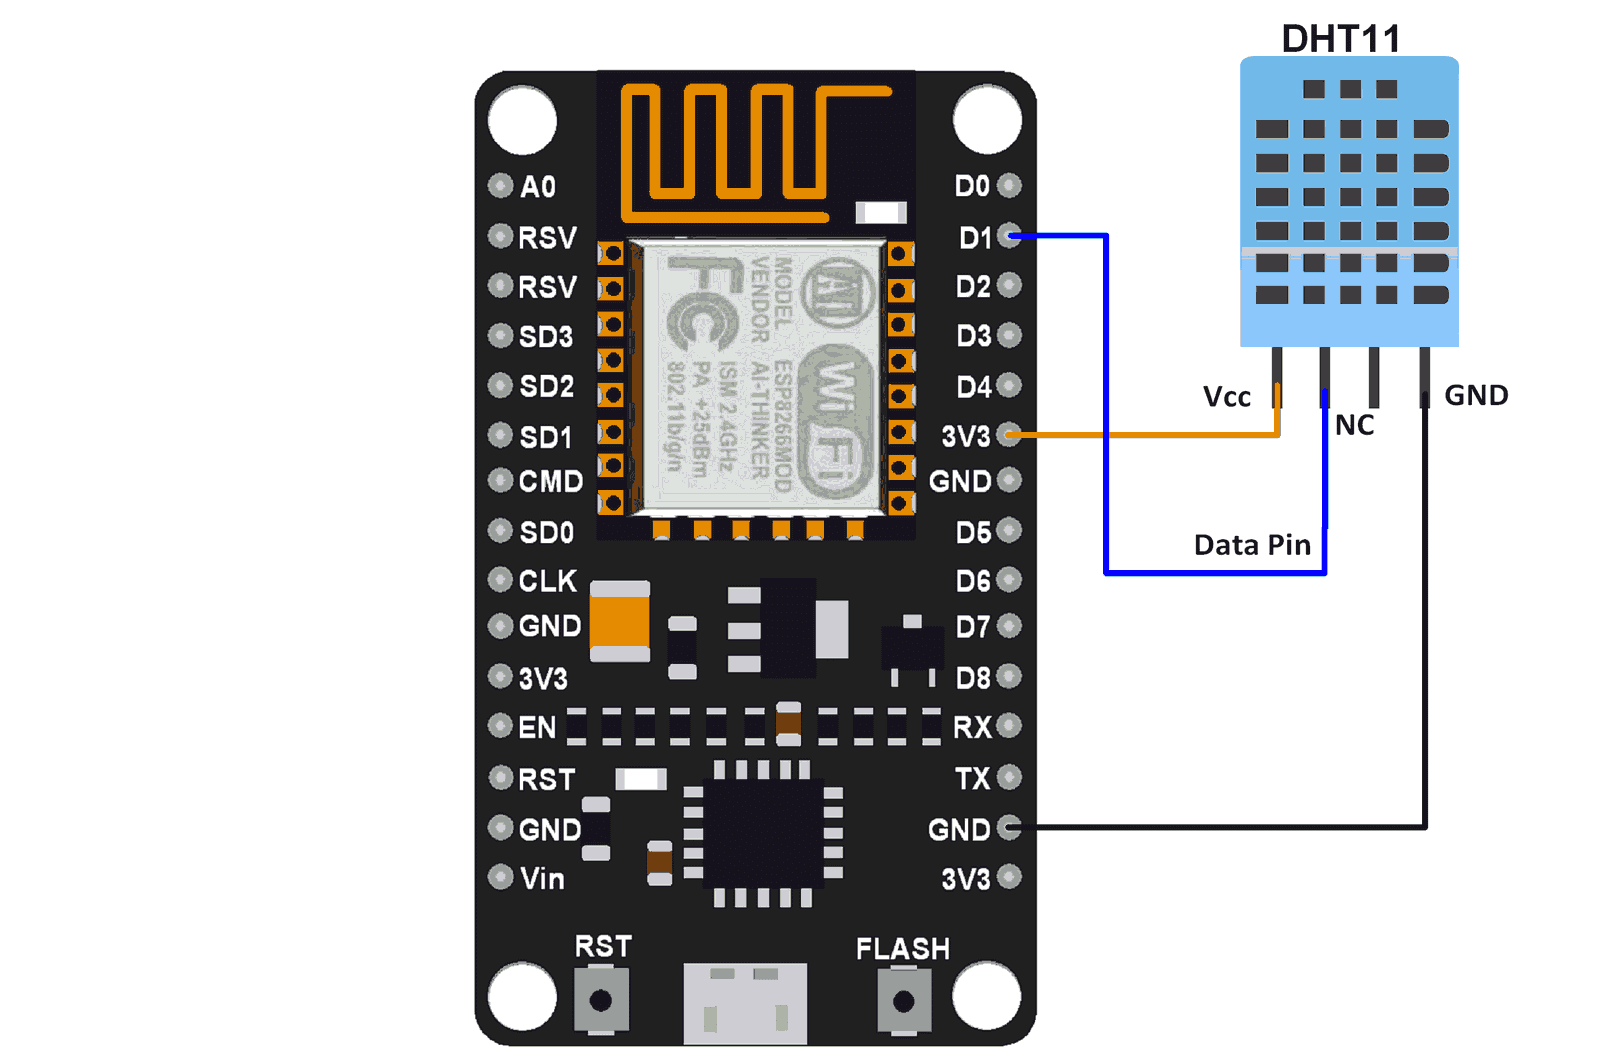
The circuit diagram is very simple like the previous image. Simply add the DHT11 library to arduinoIDE then upload this code.
Arduino Code:
#include <ESP8266WiFi.h>
#include <DHT.h>
const char* ssid = "Your_SSID";
const char* password = "SSID_Password";
const int DHTPIN = D1;
const int DHTTYPE = DHT11;
DHT dht(DHTPIN, DHTTYPE);
WiFiServer server(80);
void setup() {
Serial.begin(115200);
delay(10);
dht.begin();
WiFi.begin(ssid, password);
while (WiFi.status() != WL_CONNECTED) {
delay(500);
Serial.print(".");
}
Serial.println("");
Serial.print("WiFi connected. IP address: ");
Serial.println(WiFi.localIP());
server.begin();
Serial.println("Server started");
}
void loop() {
WiFiClient client = server.available();
if (!client) {
return;
}
float humidity = dht.readHumidity();
float temperature = dht.readTemperature();
client.println("HTTP/1.1 200 OK");
client.println("Content-Type: text/html");
client.println("Connection: close");
client.println();
client.println("<!DOCTYPE HTML>");
client.println("<html>");
client.println("<head><title>IoT Weather Station</title></head>");
client.println("<body>");
client.println("<h1>Weather Station</h1>");
client.println("<div style=\"display: inline-block; width: 200px; margin-right: 20px;\">");
client.print("<p><strong>Temperature:</strong> ");
client.print(temperature);
client.println(" ℃</p>");
client.println("</div>");
client.println("<div style=\"display: inline-block; width: 200px;\">");
client.print("<p><strong>Humidity:</strong> ");
client.print(humidity);
client.println(" %</p>");
client.println("</div>");
client.println("</body>");
client.println("</html>");
delay(10000); // Update every 10 seconds
}
Code Explanation:
This code sets up an IoT weather station using NodeMCU (ESP8266) with a DHT11 temperature and humidity sensor. Let’s break down each part of the code and its functionality:
#include <ESP8266WiFi.h> #include <DHT.h>
ESP8266WiFi.h: Library for connecting ESP8266 to Wi-Fi networks. DHT.h: Library for interfacing DHT temperature and humidity sensors.
const int DHTPIN = D1; const int DHTTYPE = DHT11; DHT dht(DHTPIN, DHTTYPE);
DHTPIN: The digital pin on NodeMCU where the DHT11 sensor is connected (D1, which corresponds to GPIO5).DHTTYPE: The type of DHT sensor used (DHT11 in this case).dht: Instance of the DHT sensor object initialized with DHTPIN and DHTTYPE.
WiFiServer server(80);
server: Creates a web server object on port 80 (HTTP port).
void setup() {
    Serial.begin(115200);
    delay(10);

    dht.begin();  // Initializes the DHT sensor.

    WiFi.begin(ssid, password);  // Connects to Wi-Fi network.
    while (WiFi.status() != WL_CONNECTED) {
        delay(500);
        Serial.print(".");
    }
    Serial.println("");
    Serial.print("WiFi connected. IP address: ");
    Serial.println(WiFi.localIP());

    server.begin();  // Starts the web server.
    Serial.println("Server started");
}
Serial.begin(115200): Initializes serial communication for debugging purposes at a baud rate of 115200.dht.begin(): Initializes communication with the DHT sensor.WiFi.begin(ssid, password): Connects NodeMCU to the specified Wi-Fi network (ssid and password).while (WiFi.status() != WL_CONNECTED): Waits until NodeMCU is connected to the Wi-Fi network.server.begin(): Starts the web server to handle client requests on port 80.Serial.println(“Server started”): Prints a message to the serial monitor indicating that the server has started successfully.
void loop() {
WiFiClient client = server.available(); // Checks for incoming client connections.
if (!client) {
return; // If no client is available, returns to the beginning of the loop.
}
float humidity = dht.readHumidity(); // Reads humidity from the DHT sensor.
float temperature = dht.readTemperature(); // Reads temperature from the DHT sensor.
client.println("HTTP/1.1 200 OK"); // Sends HTTP header to client.
client.println("Content-Type: text/html");
client.println("Connection: close");
client.println();
client.println("<!DOCTYPE HTML>"); // HTML document starts here.
client.println("<html>");
client.println("<head><title>IoT Weather Station</title></head>");
client.println("<body>");
client.println("<h1>Weather Station</h1>");
// Displays temperature and humidity in two separate div boxes.
client.println("<div style=\"display: inline-block; width: 200px; margin-right: 20px;\">");
client.print("<p><strong>Temperature:</strong> ");
client.print(temperature);
client.println(" ℃</p>");
client.println("</div>");
client.println("<div style=\"display: inline-block; width: 200px;\">");
client.print("<p><strong>Humidity:</strong> ");
client.print(humidity);
client.println(" %</p>");
client.println("</div>");
client.println("</body>");
client.println("</html>");
delay(10000); // Delays for 10 seconds before serving the next request.
}
- server.available(): Checks for incoming client connections and returns a
WiFiClientobject if available. - dht.readHumidity(): Reads humidity data from the DHT sensor.
- dht.readTemperature(): Reads temperature data from the DHT sensor.
- client.println(): Sends HTML content to the client browser.
- HTTP Headers: Sends necessary HTTP headers to the client (
HTTP/1.1 200 OK,Content-Type: text/html,Connection: close). - HTML Content: Constructs an HTML document with the title “IoT Weather Station” and displays temperature and humidity values in separate
divboxes. - delay(10000): Delays execution for 10 seconds before repeating the loop, effectively updating the weather data every 10 seconds.
Explanation:
This code initializes NodeMCU, connects it to a Wi-Fi network, and sets up a web server. It continuously reads temperature and humidity data from a DHT11 sensor and serves this data to connected clients (web browsers) in a formatted HTML page. The use of server.available() ensures that it handles incoming client requests efficiently, while delay(10000) controls how frequently the data is updated and served.
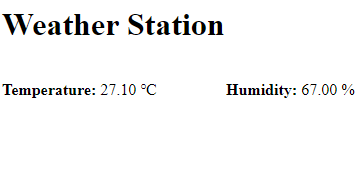
Result:
Once uploaded, run the serial terminal and take the IP address to the browser. You can see this as mine.
Conclusion:
By following this example, you can easily create your own IoT weather station using NodeMCU and a DHT11 sensor. This project demonstrates the capability of NodeMCU in collecting sensor data and serving it over a web interface, making it accessible from anywhere within your Wi-Fi network.
Would you like to explore additional features or modifications to this project?
Liked this article? Subscribe to our newsletter:
or,
Visit LabProjectsBD.com for more inspiring projects and tutorials.
Thank you!
Read more:


0 Comments