This article explains how to build a digital clock with a temperature and humidity display using an Arduino microcontroller, RTC module, DHT11 sensor, and LCD display. It provides step-by-step instructions, code examples, and explanations, making it a great introduction to Arduino programming and sensor projects. The project is practical and customizable, making it suitable for anyone interested in environmental monitoring and DIY electronics.
⚠️Disclaimer:
Working with electricity involves serious risk. Ensure you have the necessary skills and take proper safety precautions before attempting any electrical projects. Proceed at your own risk — the author assumes no responsibility for any damage, injury, or issues resulting from the use or misuse of the information provided.
All content on this website is original and protected by copyright. Please do not copy or reproduce content without permission. While most of the resources shared here are open-source and freely accessible for your learning and benefit, your respect for our intellectual effort is appreciated.
If you find our tutorials helpful, consider supporting us by purchasing related materials or sharing our work — it helps keep the content flowing.
Need help or have questions? Leave a comment below — the author is always happy to assist!
Table of Contents
About Digital Clock with Temperature & Humidity display:
A clock that displays not only time but also temperature and humidity is a useful addition to any home or office. This project uses an Arduino microcontroller, a real-time clock (RTC) module, a temperature sensor, and a humidity sensor to create a clock that displays the time, temperature, and humidity. In this article, we will explain how to build this clock temperature and humidity display with Arduino.
To make a project like this, you need the following things:
Hardware Required:
- Arduino Uno or any other compatible Arduino board
- RTC module (e.g. DS1307)
- DHT11 temperature and humidity sensor
- 16×2 LCD display or any other similar display
- Breadboard
- Jumper wires etc
Circuit Diagram:
The circuit diagram for this project is relatively simple. Connect the RTC module, temperature, and humidity sensor, and LCD display to the Arduino as follows:
- RTC module:
- VCC to 5V
- GND to GND
- SDA to A4
- SCL to A5
- DHT11 sensor:
- VCC to 5V
- GND to GND
- Data to D2
- LCD display:
- VSS to GND
- VDD to 5V
- VO to potentiometer (center pin)
- RS to D12
- RW to GND
- E to D11
- D4 to D5
- D5 to D4
- D6 to D3
- D7 to D2
- A to 5V
- K to GND
Programming:
The programming for the digital clock requires three libraries: Wire.h, RTClib.h, and DHT.h. You can download these libraries from the Arduino IDE Library Manager.
The first step in programming is to include the necessary libraries at the top of the sketch. Next, initialize the RTC module and LCD display in the setup() function. Then, in the loop() function, read the temperature and humidity values from the DHT11 sensor and display them on the LCD. Finally, display the time from the RTC module on the LCD.
Here is the complete code for this project:
#include <Wire.h>
#include <RTClib.h>
#include <DHT.h>
#include <LiquidCrystal.h>

#define DHTPIN 2
#define DHTTYPE DHT11
DHT dht(DHTPIN, DHTTYPE);

RTC_DS1307 rtc;
LiquidCrystal lcd(12, 11, 5, 4, 3, 2);

void setup() {
  Serial.begin(9600);
  lcd.begin(16, 2);
  dht.begin();
  Wire.begin();
  rtc.begin();

  if (! rtc.isrunning()) {
    Serial.println("RTC is NOT running!");
    rtc.adjust(DateTime(F(__DATE__), F(__TIME__)));
  }

  lcd.setCursor(0, 0);
  lcd.print("Temperature: ");
  lcd.setCursor(0, 1);
  lcd.print("Humidity: ");
}

void loop() {
  DateTime now = rtc.now();

  lcd.setCursor(12, 0);
  lcd.print(now.hour(), DEC);
  lcd.print(':');
  lcd.print(now.minute(), DEC);
  lcd.print(':');
  lcd.print(now.second(), DEC);

  float t = dht.readTemperature();
  float h = dht.readHumidity();

  lcd.setCursor(13, 0);
  if (t < 10) {
    lcd.print(" ");
  }
  lcd.print(t);
  lcd.print((char)223);
  lcd.print("C");

  lcd.setCursor(10, 1);
  if (h < 10) {
    lcd.print(" ");
   }
   lcd.print(h);
   lcd.print("%");

    delay(1000);
  }
Explanation:
The code begins by including the necessary libraries: Wire.h, RTClib.h, DHT.h, and LiquidCrystal.h. Then, the DHT11 sensor is defined with its data pin and sensor type. The RTC_DS1307 object is also created.
In the setup() function, the serial communication is started, the LCD is initialized, and the DHT11 sensor and RTC module are also initialized. The RTC module is checked if it’s running, if not, it’s set to the current date and time. The two lines on the LCD display are initialized with their text.
In the loop() function, the current time from the RTC module is read and displayed on the LCD. The temperature and humidity readings are also read from the DHT11 sensor, and the values are displayed on the LCD. The delay() function is used to control the refresh rate of the readings on the LCD.
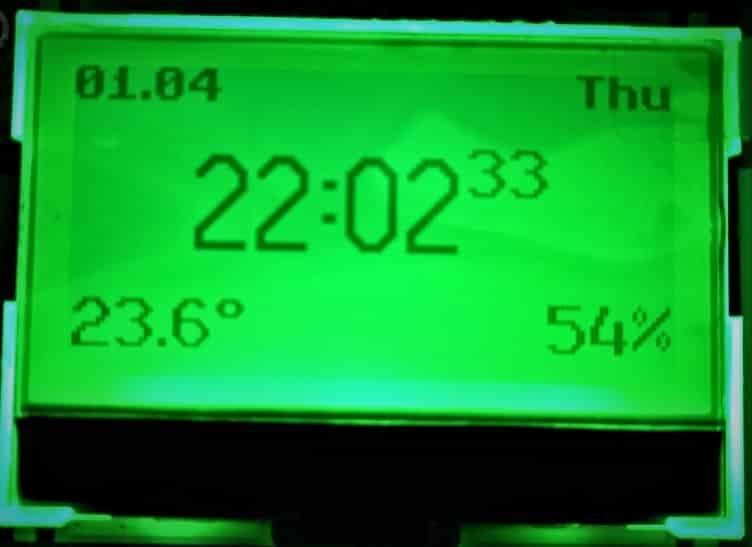
Practically I made one with ST7567 graphics display that you can use for your own.
Code with ST7567:
#define LCD_CS 53
#define LCD_DC 9  // RS_any pin
#define LCD_RST 10
#include "ST7567_FB.h"
#include <SPI.h>
ST7567_FB lcd(LCD_DC, LCD_RST, LCD_CS);
#include "fonts_all.h"


// from PropFonts library
#include "c64enh_font.h"
#include "term8x10_font.h"
#include "term11x24bolddig_font.h"

void setup() {
  Serial.begin(9600);

  lcd.init();
  lcd.setRotation(2);
  lcd.setContrast(10);
  lcd.cls();
}

int hour = 21, minute = 56, second = 25, day = 1, month = 4;
float temperature = 23.6;
int humidity = 54;
char buf[30];

void loop() {
  int x;
  lcd.cls();

  lcd.setFont(Term11x24b);
  lcd.setDigitMinWd(12);
  lcd.setCharMinWd(5);
  snprintf(buf, 25, "%d:%02d", hour, minute);
  char secs[3];
  int xp, wd = lcd.strWidth(buf);
  snprintf(secs, 3, "%02d", second);
  lcd.setFont(Term8x10);
  lcd.setDigitMinWd(12);
  lcd.setCharMinWd(5);
  wd += lcd.strWidth(secs);
  xp = 4 + (SCR_WD - wd) / 2;

  lcd.setFont(Term11x24b);
  lcd.setDigitMinWd(12);
  lcd.setCharMinWd(5);
  x = lcd.printStr(xp, 2 * 8, buf);
  lcd.setFont(Term8x10);
  lcd.printStr(x, 2 * 8, secs);

  lcd.setFont(Term8x10);
  int t1 = temperature;
  int t10 = temperature * 10 - t1 * 10;
  snprintf(buf, 25, "%d.%d' ", t1, t10);
  lcd.printStr(1, 6 * 8, buf);
  snprintf(buf, 25, " %d%%", humidity);
  lcd.printStr(ALIGN_RIGHT, 6 * 8, buf);

  lcd.setFont(c64enh);
  snprintf(buf, 25, "%02d.%02d ", day, month);
  lcd.printStr(ALIGN_LEFT, 0, buf);
  snprintf(buf, 25, " %s", "Thu");
  lcd.printStr(ALIGN_RIGHT, 0, buf);
  lcd.display();
  delay(1000);
  second++;
  if (second >= 60) {
    second = 0;
    minute++;
  }
  if (minute >= 60) {
    minute = 0;
    hour++;
  }
}
Output:
The output of my project:
In place of manual data, you can use sensor data. Then it will be the actual result.
Conclusion:
In this article, we have explained how to build a clock that displays the time, temperature, and humidity using an Arduino microcontroller, an RTC module, a DHT11 sensor, and an LCD display. The project is relatively simple and can be completed in a few hours. The clock can be placed in any room or office to provide useful information about the temperature and humidity while keeping track of time. With this project, you can improve your skills in programming and learn how to work with different sensors and display modules.
Read more on:
- How to make a digital clock with ST7567 & RTC with Arduino
- How to interface ST7567 display with Arduino
- How to interface the EM-18 RFID reader module with an Arduino
- GLCD 128×64 ST7920 interfacing with STM32
- How to interface a 16×2 LCD with an STM32
Liked this article? Subscribe to our newsletter:
or,
Visit LabProjectsBD.com for more inspiring projects and tutorials.
Thank you!


2 Comments
Enriqu · 25/06/2023 at 6:24 pm
Excellent project, like all your projects, thank you
MKDas · 02/07/2023 at 7:28 pm
Thank you