In this article, we are going to learn how to make a programmer program the 8051 MCU series. Once I got in trouble with this issue but solved it too. You can get help from my experience too. There are many examples online but very few of them really work. Many people published videos on this but if you try yourself, in most cases you are going to fail. Today, you’ll learn the secrete behind this. So let’s make our 8051 MCU Programmer.
⚠️Disclaimer:
Working with electricity involves serious risk. Ensure you have the necessary skills and take proper safety precautions before attempting any electrical projects. Proceed at your own risk — the author assumes no responsibility for any damage, injury, or issues resulting from the use or misuse of the information provided.
All content on this website is original and protected by copyright. Please do not copy or reproduce content without permission. While most of the resources shared here are open-source and freely accessible for your learning and benefit, your respect for our intellectual effort is appreciated.
If you find our tutorials helpful, consider supporting us by purchasing related materials or sharing our work — it helps keep the content flowing.
Need help or have questions? Leave a comment below — the author is always happy to assist!
Table of Contents
About 8051 MCU series:
The 8051 micro-controller is one of the most popular and most commonly used micro-controllers in various fields like embedded systems, consumer electronics, automobiles, etc. Technically called Intel MCS-51 Architecture, the 8051 micro-controller series was developed by Intel in the year 1980 and was very popular in the ’80s (still are popular).
The 8051 Micro-controller has many features like Serial Communication, Timers, Interrupts, etc. and hence many students and beginners start their work on the concept of Micro-controllers with 8051 Micro-controller (although this trend seems to be changed with the introduction of Arduino).
Even though 8051 Micro-controller might seem a little bit out of fashion, we feel that it is one of the best platforms to get started with microcontrollers, Embedded Systems, and Programming (both C and Assembly).

The 8051 MCU series have several micro-controllers on the list. Among this list, AT89C51/52, AT89S51/52 are the most popular. C series have serial programming options but we can program the S series with a USBasp programmer. Here in this article, we’ll learn to make a programmer program 89S52 MCU.

You may need this one too: PICKit2 PIC programmer.
Programming 89S52:
If you search over the internet how to program 89S52 micro-controller then you’ll get tons of result programming with a USBasp programmer. A programmer like this one will come in the front line:

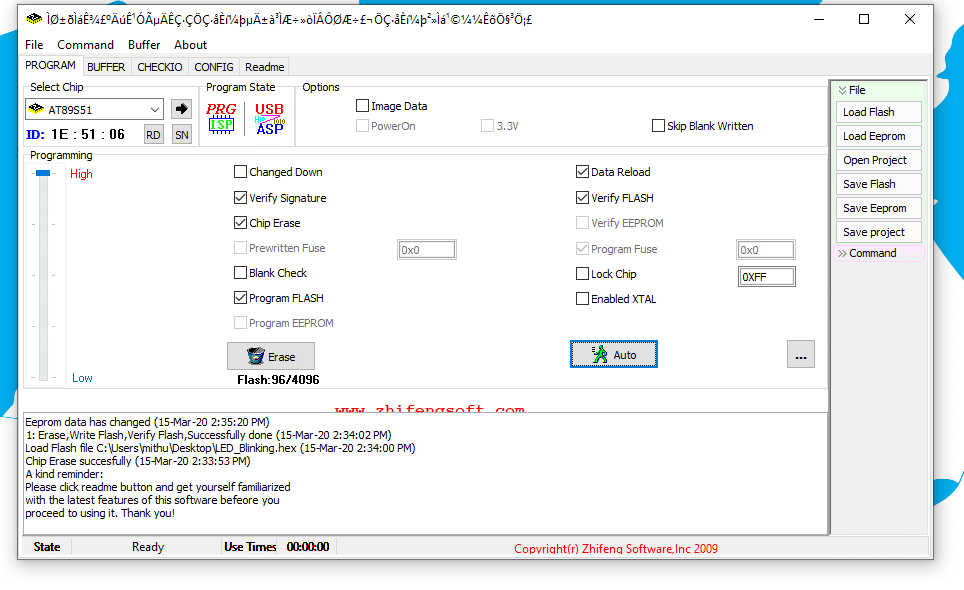
You’ll need software for this programmer. Many people suggest using Progisp1.72. This one is very easy and popular for the 8051 series. You can program AT89S51/52 with this programmer.

You can find other software for USBasp programmers from here. But as we are discussing the 8051 series, I’ll discuss programming 89S52 MCU. Note that 89S51 works in a similar way.
USBasp programmer:
One day I got in trouble with this issue. I had to make my custom USBasp programmer for a product where the programmer has to be built-in with other circuits on a single board. I could use a USBasp dongle programmer but that would never look good for that product.

I started searching about programming 89S52, got tons of results with USBasp. Collected 3 types of programmers from the local market and tested each of them. The Chinese one supports AT89S52 but the German one which I found locally doesn’t support AT89S52. I was confused about this issue which one to use.
I found a circuit diagram for USBasp online and made a test PCB for that to test if my programmer works. I found the firmware in www.fischl.de which is actually German-based. Tested my programmer, it can program ATmega8 but can not detect AT89S52. I found ‘Chip Enable Program Error’.

My USBasp programmer:
Making a USBasp programmer is very easy as it is open source. You can find this circuit diagram over the internet:

I made my own PCB using this circuit diagram. Although I removed some parts of it it was not so important to keep.
Here is my programmer:

Problem Solving:
After copying the firmware from the Chinese one (.HEX and EEPROM) I loaded them to Atmega8A of my USBasp programmer with the help of AVRDUDE.

When programming your Atmega8, set L fuse to 0xEF and H fuse to 0xC9. And select the flash(here you’ll get a bin file which will work fine) and EEPROM file. Then program. And it works!. Yes, it can detect and I can program At89S52 MCU.
I made a video on this too:
PCB:
I made PCB for my USBasp programmer. And this is tested ok. For your own, you can use it too:

Conclusion:
USBasp is an open-source programmer. And I think, there is no such credit claiming that I made it. But my experience sharing may help you to solve your problem and make your work easy. That is why I’m gladly kept it open source for all of you.
Here are the files which you can download and make your own USBasp programmer for the 8051 series with other standard MCUs.
Download ziadag [driver installer].
I thank all the contributors who made it easy and open-source [USBasp programmer]. And thank you too for reading up to this. I hope you got a similar problem and now you can solve your problem too. If you need any help, feel free to contact me. Thank you.
Liked this article? Subscribe to our newsletter:
or,
Visit LabProjectsBD.com for more inspiring projects and tutorials.
Thank you!
Check this out: 5 coolest multimeters you can buTop 5 Digital Multimeters for beginners


5 Comments
Starlyte · 03/06/2021 at 5:52 pm
Thank you very much for the tutorial pcb and all. Very complete and helpful.
MKDas · 05/06/2021 at 5:05 am
You are welcome
R.D.Prasad · 21/01/2022 at 11:43 am
avrdude mcu not detect.. plese help
MKDas · 21/01/2022 at 5:27 pm
maybe you missed a connection in hardware or any device is not working.
Ninad · 11/01/2025 at 4:12 pm
Thanks man