In our previous articles, we learned how to make an AC voltmeter and how to measure high voltage AC voltage. In this article, we will learn how to make a high voltage AC voltmeter. Yes, you can measure 500V+ or higher easily with this circuitry.
⚠️Disclaimer:
Working with electricity involves serious risk. Ensure you have the necessary skills and take proper safety precautions before attempting any electrical projects. Proceed at your own risk — the author assumes no responsibility for any damage, injury, or issues resulting from the use or misuse of the information provided.
All content on this website is original and protected by copyright. Please do not copy or reproduce content without permission. While most of the resources shared here are open-source and freely accessible for your learning and benefit, your respect for our intellectual effort is appreciated.
If you find our tutorials helpful, consider supporting us by purchasing related materials or sharing our work — it helps keep the content flowing.
Need help or have questions? Leave a comment below — the author is always happy to assist!
Before you read further, I’ll request you to read the other articles
Table of Contents
Different ways to measure high voltage AC:
There are different ways to measure high voltage AC. A transformer is the most common device in this case. But when we need to consider the size and weight, we have to find other ways to do the job.
An Op-Amp can be used in this case. Op-Amps are cheap and small in size and weight is also negligible comparing with transformers. A circuit like this is very very helpful for this purpose:
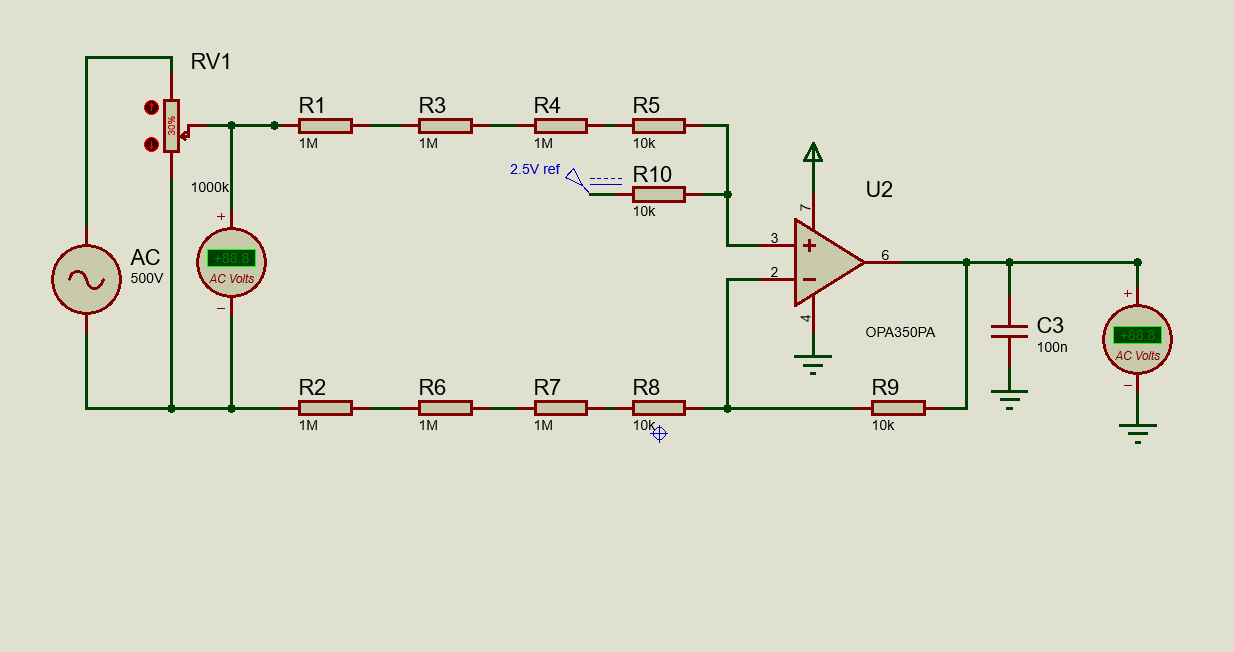
Voltmeter circuit diagram:

Coding:
/*******************************************************************************
* Program for "High voltage AC voltmeter"                                      *
* Program written by_ Engr. Mithun K. Das                                      *
* MCU:PIC16F73; X-Tal:8MHz; mikroC pro for PIC v7.6.0                          *
* Date:05-05-2020                                                              *
*******************************************************************************/
char segment_array[]={0x3F,0x06,0x5B,0x4F,0x66,0x6D,0x7D,0x07,0x7F,0x6F};//cmmon cathode_non dot

sbit digit0 at RC0_bit;
sbit digit1 at RC1_bit;
sbit digit2 at RC2_bit;
sbit digit3 at RC3_bit;

char digits[5];
void display_7segment(int number)
{
   digits[3]=number/1000u;
   digits[2]=(number/100u)%10u;
   digits[1]=(number/10u)%10u;
   digits[0]=(number/1u)%10u;
}

void InitTimer0()
{
  OPTION_REG     = 0x85;
  TMR0           = 100;
  INTCON         = 0xA0;
}

int position=0;
void Interrupt() iv 0x0004 ics ICS_AUTO
{
  if (TMR0IF_bit)
  {
    TMR0IF_bit   = 0;
    TMR0         = 100;

    digit0 = 1;
    digit1 = 1;
    digit2 = 1;
    digit3 = 1;
    if(position>3)position=0;

    if(position==1)PORTB = segment_array[digits[position]]+128; //dot point
    else PORTB = segment_array[digits[position]];

    if(position==3)
    {
        digit0 = 0;
        digit1 = 1;
        digit2 = 1;
        digit3 = 1;
    }
    else if(position==2)
    {
        digit0 = 1;
        digit1 = 0;
        digit2 = 1;
        digit3 = 1;
    }
    else if(position==1)
    {
        digit0 = 1;
        digit1 = 1;
        digit2 = 0;
        digit3 = 1;
    }
    else if(position==0)
    {
        digit0 = 1;
        digit1 = 1;
        digit2 = 1;
        digit3 = 0;
    }
    position++;
  }
}


void Get_AC_Voltage(void);
unsigned int max_point=0,mm=0,k=0,temp=0,adc_rd0=0,ac_voltage;
void main()
{
 TRISA=0xFF;//all input
 TRISB=0x00;//all output
 TRISC=0x00;//all output
 PORTB=0x00;
 PORTC=0x00;//clear ports
 ADCON1=0x00;//all analog in
 InitTimer0();//5ms timer
 while(1)
 {

    Get_AC_Voltage(void);
    display_7segment(ac_voltage);

 }
}

void Get_AC_Voltage(void)
{
      int mm;
      max_point = 0;//clear all data
      adc_rd0 = 0;//clear data
      for(mm=0;mm<10;mm++)
      {
          for(k=0;k<500;k++)
          {
               ADCON0 = 0b00000001;//AN0 selected
              if(temp = ADC_Read(0),temp>max_point)
              {
                  max_point = temp;
              }
          }
          max_point = abs(ceil((long)(max_point-128)));
          adc_rd0+= max_point*41.8;
      }
      adc_rd0/=10;

      ac_voltage = adc_rd0;
}
Code explanation:
char segment_array[]={0x3F,0x06,0x5B,0x4F,0x66,0x6D,0x7D,0x07,0x7F,0x6F};//cmmon cathode_non dot

sbit digit0 at RC0_bit;
sbit digit1 at RC1_bit;
sbit digit2 at RC2_bit;
sbit digit3 at RC3_bit;
In this part, we took an array for different digits of 7-Segment. And later on, set our MCU’s pins for different digits of the 4×1 7-Segment so that we can call the digit directly later.
char digits[5];
void display_7segment(int number)
{
   digits[3]=number/1000u;
   digits[2]=(number/100u)%10u;
   digits[1]=(number/10u)%10u;
   digits[0]=(number/1u)%10u;
}
In this part, display_7segment is just taking each digit of a number and saves in array digits[]. This will be called in ISR later.
void Interrupt() iv 0x0004 ics ICS_AUTO
{
  if (TMR0IF_bit)
  {
    TMR0IF_bit   = 0;
    TMR0         = 100;

    digit0 = 1;
    digit1 = 1;
    digit2 = 1;
    digit3 = 1;
    if(position>3)position=0;

    if(position==1)PORTB = segment_array[digits[position]]+128; //dot point
    else PORTB = segment_array[digits[position]];

    if(position==3)
    {
        digit0 = 0;
        digit1 = 1;
        digit2 = 1;
        digit3 = 1;
    }
    else if(position==2)
    {
        digit0 = 1;
        digit1 = 0;
        digit2 = 1;
        digit3 = 1;
    }
    else if(position==1)
    {
        digit0 = 1;
        digit1 = 1;
        digit2 = 0;
        digit3 = 1;
    }
    else if(position==0)
    {
        digit0 = 1;
        digit1 = 1;
        digit2 = 1;
        digit3 = 0;
    }
    position++;
  }
}
In this ISR, we just displaying our multiplexed 7-segment with the help of timer interrupt. Timer0 is used in this case here. A dot point is positioned too here.
void Get_AC_Voltage(void)
{
      int mm;
      max_point = 0;//clear all data
      adc_rd0 = 0;//clear data
      for(mm=0;mm<10;mm++)
      {
          for(k=0;k<500;k++)
          {
               ADCON0 = 0b00000001;
              if(temp = ADC_Read(0),temp>max_point)
              {
                  max_point = temp;
              }
          }
          max_point = abs(ceil((long)(max_point-128)));// subtract 2.5V
          adc_rd0+= max_point*41.8; //after calculation,calibration factor.
      }
      adc_rd0/=10;

      ac_voltage = adc_rd0;
}
And finally, in the AC voltage measurement section, we used the same peak finding method with the average result like our AC voltmeter’s code. Only one thing is changed here is the calibration factor. Also note that as the output of Op-Amp circuitry is 2.5V at no input voltage so we have to subtract 2.5V from our calculation.
Test result:
Here is the test result of our high voltage AC voltmeter:
As you can see our voltmeter is displaying almost the exact voltage it is supplied from the POT-VR. A small error in the result is not so bad at all. Although this error can be eliminated in professional design by tuning the circuit and code.
This way, we can measure 500V+(!!!) even more if the resistors are selected properly. Remember, electricity is always dangerous. Work carefully at your own risk!!!
A non-polar 0.01uF capacitor can be used just at the input terminals of our Op-Amp to reduce noise. Note that, this may reduce the response time but it will filter most of the noises. R-C filter also can be added after output which will make the output more noise-free.
Anyway, I hope you enjoyed the article and will be able to make a voltmeter for yourself which can measure high voltage. If you need any help, feel free to ask. Thank you, Enjoy!
Liked this article? Subscribe to our newsletter:
or,
Visit LabProjectsBD.com for more inspiring projects and tutorials.
Thank you!
Check this out: 5 coolest multimeters you can buy


16 Comments
djalltra · 20/10/2020 at 11:38 pm
please how do you calculate you calibration factor (41.8) am confused
Mithun K. Das · 21/10/2020 at 5:53 am
It comes from ADC calculation with little adjustment. 5/1024*(resistor voltage divider factor)*calibration factor.
djalltra · 21/10/2020 at 9:02 am
can you please explain clearly because I know resistor voltage divider factor is the gain but I can’t figure out how you got 41.8 as you gave little to no explanations on how you arrived at that also I don’t know why you divided result by 10
Mithun K. Das · 22/10/2020 at 5:47 am
Kindly read this article first. https://labprojectsbd.com/2020/05/09/dc-current-measurement-using-shunt-resistor-and-op-amp-circuit/
Then you can be able to calculate the factor.
djalltra · 21/10/2020 at 10:05 am
still not clear as you gave no proper explanations on how you arrived at 41.8 ,I understand voltage divider factor is the gain and why do you divide by 10 in the end
Mithun K. Das · 22/10/2020 at 5:50 am
OK. You should read this article first to know about the gain factor:
https://labprojectsbd.com/2020/05/09/dc-current-measurement-using-shunt-resistor-and-op-amp-circuit/
Then you can calculate the other calculations from ADC calculation.
But note that, minor changes need to be done because of tollarances. So another calibration factor arrive. Finally, 41.8 comes in this circuit. It can be different in a different circuits due to the tollarance of resistance. Better using a POT.
djalltra · 23/10/2020 at 7:49 am
OK correct me if am wrong because the micro cannot measure negative voltages you added 2.5v to raise the opamp output voltage so from your circuit the calculated gain was 0.00322 so our vout from opamp will be 0.00322*(Max volt measured) =0.00322*500=1.61 so our total opamp output voltage is 1.61+voffset =1.61+2.5=4.11 am guessing you multiplied by 10 to get the 41.8 like I said correct me if am wrong
Mithun K. Das · 01/11/2020 at 2:24 pm
Yes, you are right.
djalltra · 24/10/2020 at 2:39 am
i calculated my gain as R9/R2+R6+R7+R8 Which gives 0.00322 so our opamp output voltage will be Vout=0.00322×500=41.1 so our total opamp output wiltage is 1.61+voffset=1.61+2.5=4.11 am guessing you multiplied by 10 to get 41.8
Mithun K. Das · 01/11/2020 at 2:23 pm
yes
sammy · 25/10/2020 at 3:37 pm
how did you arrive at 41.8
Mithun K. Das · 01/11/2020 at 2:23 pm
From adc calculation.
rico · 26/10/2020 at 9:08 pm
I tried this code and simulation and it doesn’t work I just get one constant reading of 528v
Mithun K. Das · 01/11/2020 at 2:19 pm
Kindly attach the simulation file and code. or email to admin’s email from the contact section. Thanks.
Mihail · 27/06/2022 at 4:39 pm
Hi! if i replace the OPA365 with another op amp without changing the circuit, will it still work?
i looked at their specs and realized that opa365 is newer and faster and the case is smaller and cheaper in my country.
MKDas · 27/06/2022 at 9:07 pm
You can use similar. Just check the datasheet before.