One-wire communication, also known as 1-Wire, is a serial communication protocol that allows devices to communicate using only a single data line. To interface sensors or communicate between two systems this one wire is being used. In this chapter, we’ll learn about this particular method of communication. So let’s begin.
⚠️Disclaimer:
Working with electricity involves serious risk. Ensure you have the necessary skills and take proper safety precautions before attempting any electrical projects. Proceed at your own risk — the author assumes no responsibility for any damage, injury, or issues resulting from the use or misuse of the information provided.
All content on this website is original and protected by copyright. Please do not copy or reproduce content without permission. While most of the resources shared here are open-source and freely accessible for your learning and benefit, your respect for our intellectual effort is appreciated.
If you find our tutorials helpful, consider supporting us by purchasing related materials or sharing our work — it helps keep the content flowing.
Need help or have questions? Leave a comment below — the author is always happy to assist!
If you missed the previous chapter, you can read it here:
Table of Contents
Basics of One-Wire Communication:
The 1-Wire protocol is similar to I2C but it is a single-wire interface, half-duplex, bidirectional, low power, low speed, and long-distance serial data communication protocol. Although it is called One-Wire, in practice it needs 2/3 wires. Because the Power and Ground also need to be connected. So basically it is communicating through one wire but practically it is two-wire communication where GND is a common connection. But in some cases, the power can be different lines with standard voltage readings.
Interfacing One wire Sensor:
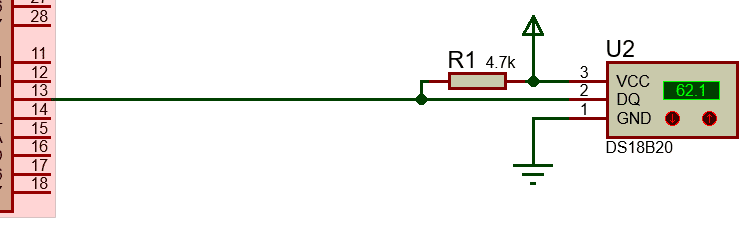
One of the common One-Wire sensors is ds18b20. This sensor can receive and transmit data through only one wire. That is why the communication is called One Wire communication. Anyway, let’s see the circuit diagram.
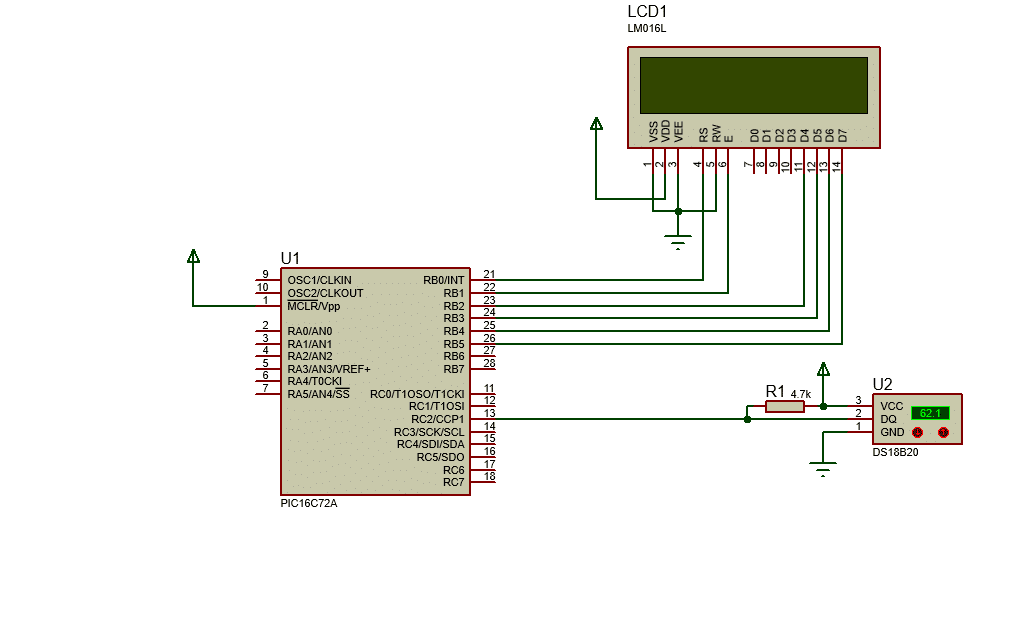
We included an LCD in the setup to display the temperature readings from the DS18B20 sensor. The One-Wire communication protocol is versatile and can be implemented on most digital I/O pins, depending on the microcontroller’s configuration. For this project, we used the RC2 pin on the PORTC of the PIC16F76. However, depending on additional pin functions, you may need to reallocate the pin based on your specific microcontroller setup.
For more projects and detailed guides, stay connected with our community. Thank you for reading, and happy coding!
Code:
/*
  Program for "One wire sensor interfacing"
  Program written by_ Mithun K. Das | WhatsApp +8801972448270
  MCU:PIC16F72; Xtal:8MHz; mikroC pro for PIC v7.6.0 | Date: 26-Feb-24
*/
// LCD module connections
sbit LCD_RS at RB0_bit;
sbit LCD_EN at RB1_bit;
sbit LCD_D4 at RB2_bit;
sbit LCD_D5 at RB3_bit;
sbit LCD_D6 at RB4_bit;
sbit LCD_D7 at RB5_bit;
sbit LCD_RS_Direction at TRISB0_bit;
sbit LCD_EN_Direction at TRISB1_bit;
sbit LCD_D4_Direction at TRISB2_bit;
sbit LCD_D5_Direction at TRISB3_bit;
sbit LCD_D6_Direction at TRISB4_bit;
sbit LCD_D7_Direction at TRISB5_bit;
// End LCD module connections

const unsigned short TEMP_RESOLUTION = 12;
char *text = "000.0000";
unsigned temp;

void Display_Temperature(unsigned int temp2write)
{
 const unsigned short RES_SHIFT = TEMP_RESOLUTION - 8;
 char temp_whole;
 unsigned int temp_fraction;

 // check if temperature is negative
 if (temp2write & 0x8000)
 {
    text[0] = '-';
    temp2write = ~temp2write + 1;
    temp_whole = temp2write >> RES_SHIFT ;
 }
 else
 {
    // extract temp_whole
    temp_whole = temp2write >> RES_SHIFT ;
    // convert temp_whole to characters
    if (temp_whole/100)  text[0] = temp_whole/100 + 48;
    else text[0] = ' ';
 }

 text[1] = (temp_whole/10)%10 + 48; // Extract tens digit
 text[2] = temp_whole%10 + 48; // Extract ones digit

 // extract temp_fraction and convert it to unsigned int
 temp_fraction = temp2write << (4-RES_SHIFT);
 temp_fraction &= 0x000F;
 temp_fraction *= 625;

 // convert temp_fraction to characters
 text[4] = temp_fraction/1000 + 48; // Extract thousands digit
 text[5] = (temp_fraction/100)%10 + 48; // Extract hundreds digit
 text[6] = (temp_fraction/10)%10 + 48; // Extract tens digit
 text[7] = temp_fraction%10 + 48; // Extract ones digit

 Lcd_Out(2, 5, text);// Display temperature on LCD
}

void main()
{

 Lcd_Init(); // Initialize LCD
 Lcd_Cmd(_LCD_CLEAR); // Clear LCD
 Lcd_Cmd(_LCD_CURSOR_OFF); // Turn the cursor off

 Lcd_Out(1, 1, " Temperature: ");
 Lcd_Chr(2,13,223);// Print degree character
 Lcd_Chr(2,14,'C');// 'C' for Centigrades

 while (1)
 {
     //Read DS18B20
     Ow_Reset(&PORTC, 2);       // Onewire reset signal
     Ow_Write(&PORTC, 2, 0xCC); // Issue command SKIP_ROM
     Ow_Write(&PORTC, 2, 0x44); // Issue command CONVERT_T
     Delay_us(120);
     Ow_Reset(&PORTC, 2);       // Onewire reset signal
     Ow_Write(&PORTC, 2, 0xCC); // Issue command SKIP_ROM
     Ow_Write(&PORTC, 2, 0xBE); // Issue command READ_SCRATCHPAD
     temp = Ow_Read(&PORTC, 2);
     temp = (Ow_Read(&PORTC, 2) << 8) + temp;


     Display_Temperature(temp);//Format and display result on Lcd
     Delay_ms(500);
 }
}
Code explanation:
Key Variables and Constants:
TEMP_RESOLUTION: Resolution of the temperature measurement.text: A character array for storing the formatted temperature string.temp: Variable to store the temperature data read from the sensor.
Functions:
- Display_Temperature: Converts raw temperature data to a readable format and displays it on the LCD.
- Checks if the temperature is negative.
- Extracts the whole and fractional parts of the temperature.
- Converts these parts to characters and formats them for display.
Main Function:
- Initialization: Initializes the LCD and clears the display.
- Temperature Reading Loop:
- Ow_Reset: Sends a reset signal to the DS18B20.
- Ow_Write: Sends commands to the DS18B20 (SKIP_ROM, CONVERT_T, READ_SCRATCHPAD).
- Ow_Read: Reads the temperature data from the DS18B20.
- Display_Temperature: Formats the temperature and displays it on the LCD.
Result:
You can interface with other similar sensors like this. But each sensor has different triggering commands after which the sensor replies. Just check the datasheet for those commands. Then add that in the code.
Conclusion:
I hope this guide will assist you in interfacing One-Wire sensors like the DS18B20 with your MCU. This implementation can be an integral part of your project, providing accurate temperature readings and enhancing your understanding of one-wire communication. For additional projects and resources, stay connected with our community. Your feedback and participation are valuable. Thank you for reading, and happy coding!
Liked this article? Subscribe to our newsletter:
or,
Visit LabProjectsBD.com for more inspiring projects and tutorials.
Thank you!
Read more:


2 Comments
Joy · 29/06/2024 at 10:33 pm
Sir thanks a lot for the article. what to do if I use LM 35 here.
MKDas · 30/06/2024 at 1:50 pm
welcome